
Watch App中两种导航样式的说明和各种控件基本介绍和使用。
![]()
导航方式
Watch App中导航样式分为两种:分页样式(Page based) 和分层样式(Hierarchical), 这两种样式是互斥的,所以不能混合使用只能选择其一。Hierarchical方式可以通过pushController或者presentController来显示二级页面; 而Page based方式只能通过presentController来模态出新的二级页面。
Page based
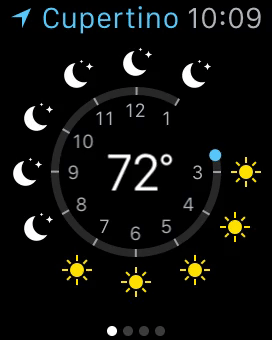
分页样式导航(Page-based)是一种呈现平面信息集合的方式, 其中所有页面都是平级的。在分页样式导航中, 用户水平滑动或者垂直滑动以在页面之间导航, 并且白点表示它们在页面集中的位置。由于浏览大量页面可能非常耗时, 因此请限制界面中包含的页数。
Hierarchical
分层导航非常适合分层信息的应用程序。它还可以更轻松地扩展应用的新内容。当用户点击层次结构中的项目时,会出现一个新屏幕,显示有关该项目的详细信息。通过垂直基于页面的导航,用户还可以使用数字表冠或在详细视图上垂直滑动,在不同行的详细视图之间快速导航。但要尽量避免创建深度超过2-3级的层次结构。
控件详解
iOS中的大部分控件在 WatchOS中也在有, 比如: WKInterfaceLabel、WKInterfaceImage、WKInterfaceButton、WKInterfacePicker、WKInterfaceTable、WKInterfaceSwitch、WKInterfaceSlider、等类。还有一些 WatchOS特有的类, 比如: WKInterfaceGroup、WKInterfaceSeparator、WKInterfaceMenu、WKInterfaceDate、WKInterfaceTimer等类。下面我将对部分控件进行详细的使用说明。
WKInterfaceImage
Image相关控件
WatchOS中很多控件都可以与WKInterfaceImage类结合使用:
1.WKInterfaceGroup,WKInterfaceButton和WKInterfaceController类允许您指定图像作为其背景。
2.WKInterfaceSlider类可以显示增量和减量控件的自定义图像。
3.WKInterfaceMovie类显示视频或音频内容的海报图像。
4.WKInterfacePicker类显示可包含图像的项目。
Image性能
关于图片的使用有一个坑需要注意, 当我们为WKInterfaceImage类添加图片时, 可能会遇到图片不显示的问题。这是因为所使用的方法和图片资源库是有一定的关系的。
1.当使用setImageNamed:或setBackgroundImageNamed:方法添加图片时, 应该使用 Watch App包内Assets.xcassets中的已有的图片资源。
2.当使用setImage:、setImageData:、setBackgroundImage:或setBackgroundImageData:方法添加图片时, 应该使用 WatchKit Extension包内Assets.xcassets中的图片资源。
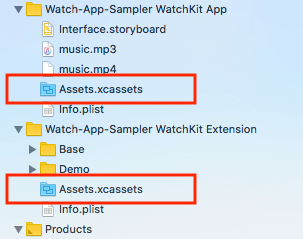
使用第2条的方式时, 会先在 WatchKit Extension中创建 Image, 然后在传输到 WatchKit App中进行显示。而在第1条中按名称指定图像更有效,因为只需要将名称字符串传输到您的Watch App中, 然后会在 Watch App包中搜索指定名称的图像文件, 并进行显示。所以指定图像的最有效方法是将它们存储在 Watch App包中,并使用setImageNamed:或setBackgroundImageNamed:适当地配置相应的对象。
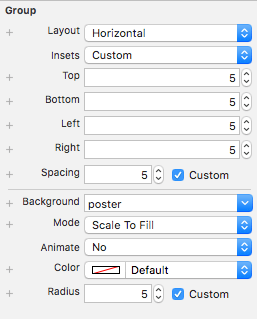
WKInterfaceGroup
WKInterfaceGroup在 WatchOS中的一个很特别的类, 它是一个容器性质的控件, 能为其他控件提供额外的布局。Group可以指定其所包含控件的排列方向, 横向或者纵向, 也可以设置间距和内嵌。它还能为自己添加背景图片, 作为一个种控件叠加的效果这是一个不错的选择, 因为在 WatchOS中是不允许控件相互重叠的, 除了像Group这样容器类的控件。
Group中还有一些属性如下:
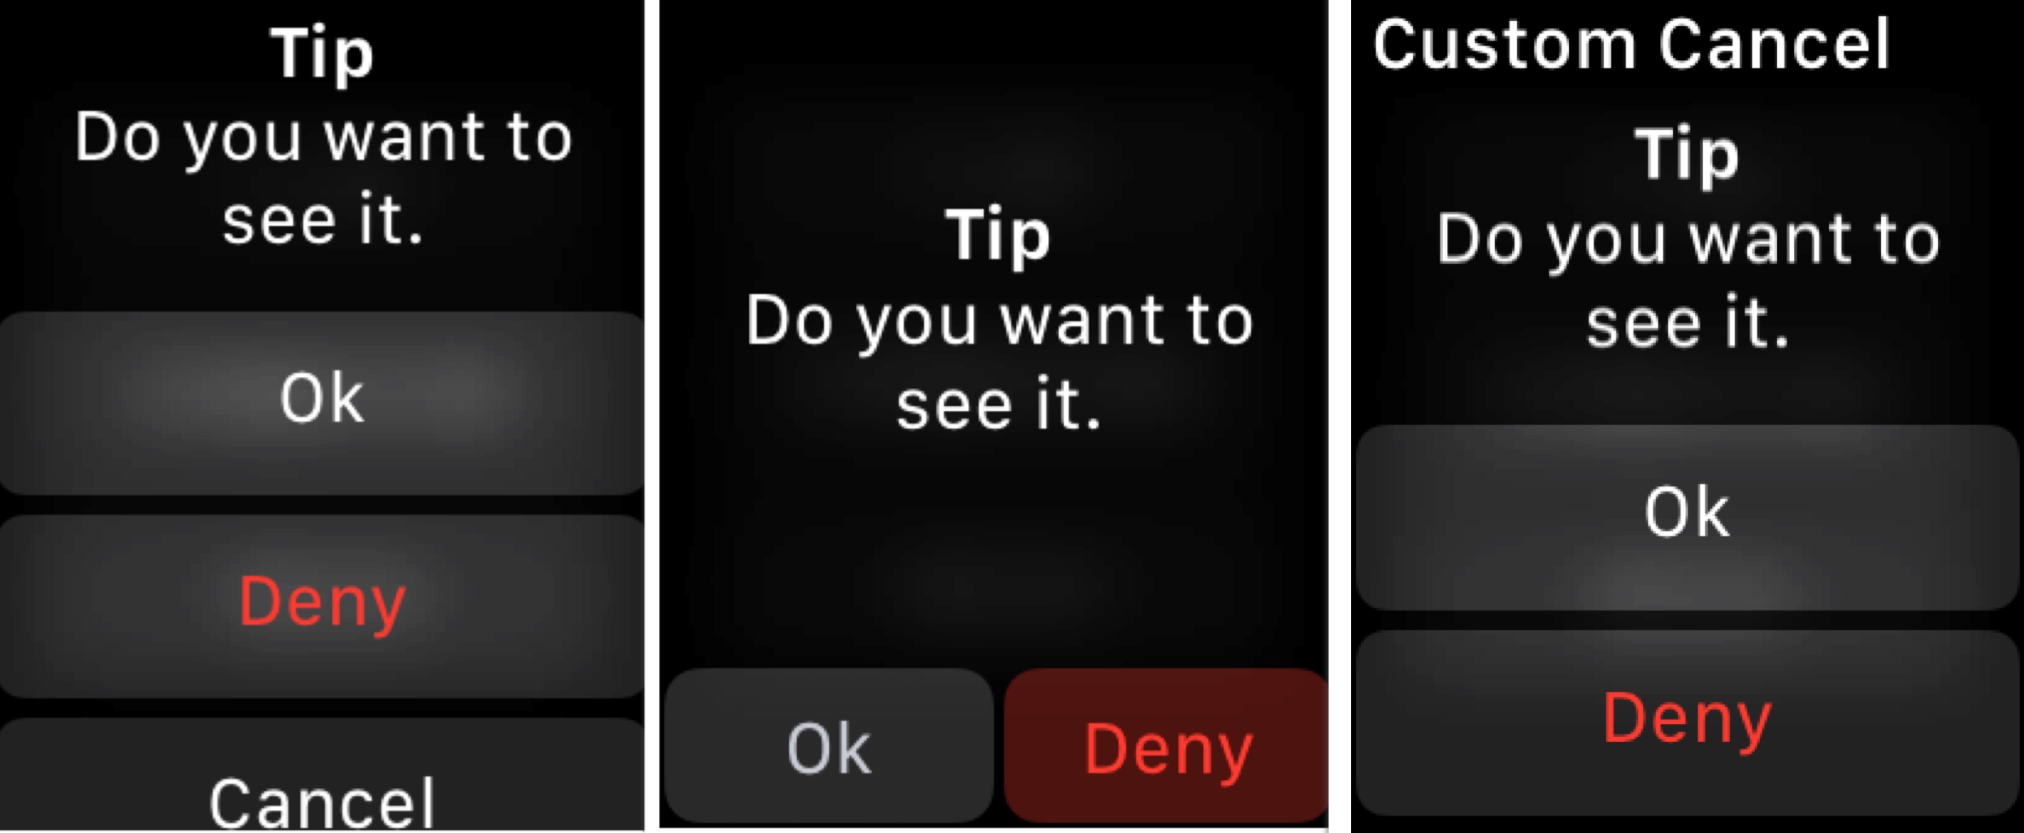
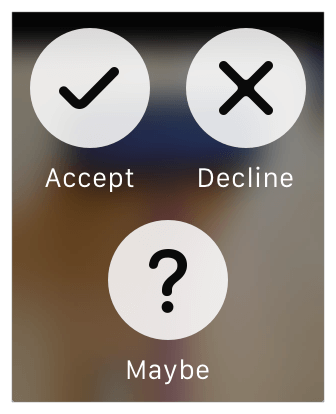
WKAlertControllerStyle
自 WatchOS 2.0开始, 就已经支持系统 Alert了, WKAlertControllerStyle枚举类型包含以下三种:
public enum WKAlertControllerStyle : Int {
    case alert
    case sideBySideButtonsAlert
    case actionSheet
}
它们对应的样式是这样的:

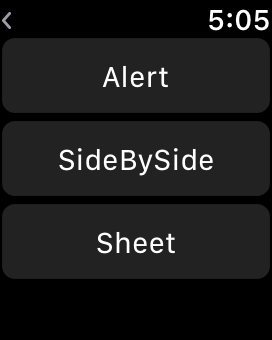
代码描述
在当前页面创建三个按钮, 点击事件别分展示不同类型的 Alert。
具体代码如下:
@IBAction func presentAlertStyleAction() {

    let confirmAction = WKAlertAction(title: "Ok", style: .default) {
        print("Ok")
    }
    let denyAction = WKAlertAction(title: "Deny", style: .destructive) {
        print("Deny")
    }
    let cancelAction = WKAlertAction(title: "Cancel", style: .cancel) {
        print("Cancel")
    }
    presentAlert(withTitle: "Tip", message: "Do you want to see it.", preferredStyle: .alert, actions: [confirmAction, denyAction, cancelAction])
}

@IBAction func presentSideBySideStyleAction() {

    let confirmAction = WKAlertAction(title: "Ok", style: .default) {
        print("Ok")
    }
    let denyAction = WKAlertAction(title: "Deny", style: .destructive) {
        print("Deny")
    }
    presentAlert(withTitle: "Tip", message: "Do you want to see it.", preferredStyle: .sideBySideButtonsAlert, actions: [confirmAction, denyAction])
}

@IBAction func presentSheetStyleAction() {

    let confirmAction = WKAlertAction(title: "Ok", style: .default) {
        print("Ok")
    }
    let denyAction = WKAlertAction(title: "Deny", style: .destructive) {
        print("Deny")
    }
    let cancelAction = WKAlertAction(title: "Custom Cancel", style: .cancel) {
        print("Cancel")
    }
    presentAlert(withTitle: "Tip", message: "Do you want to see it.", preferredStyle: .actionSheet, actions: [confirmAction, denyAction, cancelAction])
}
运行效果
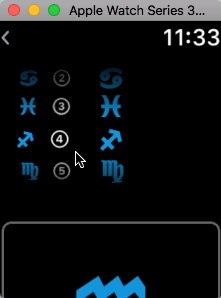
WKInterfacePicker
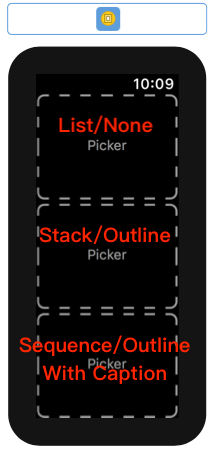
WKInterfacePicker的Style属性有三种, 分别是List、Stack、Sequence。Focus Style属性也有三种分别是None、Outline、Outline with Caption。
在 Storyboard中我们先添加3个Picker, 然后要对它们进行设置不同的Style属性和Focus Style属性。目的是为了, 对比它们之前的区别。
代码描述
3个Picker关联到代码文件, 懒加载配置数据:
@IBOutlet var listPicker: WKInterfacePicker!
@IBOutlet var stackPicker: WKInterfacePicker!
@IBOutlet var sequencePicker: WKInterfacePicker!

lazy var itemArray: [WKPickerItem] = {
    var its = [WKPickerItem]()
    let titles = ["①", "②", "③", "④", "⑤"]
    let captions = ["① is one", "② is two", "③ is three", "④ is four", "⑤ is five"]

    for i in 0...4 {
        let item = WKPickerItem()
        item.title = titles[i]
        item.caption = captions[i]
        let string = "item_type_\(i + 1)"
        item.accessoryImage = WKImage(imageName: string)
        item.contentImage = WKImage(imageName: string)
        its.append(item)
    }
    return its
}()
初始化的时候, 对3个Picker进行配置:
override func awake(withContext context: Any?) {
    super.awake(withContext: context)

    listPicker.setItems(itemArray)
    stackPicker.setItems(itemArray)
    sequencePicker.setItems(itemArray)

    listPicker.focus()
}
为Picker添加的Action:
@IBAction func listPickerSelect(_ value: Int) {
    print(itemArray[value].title!)
}

@IBAction func stackPickerSelect(_ value: Int) {
    print(itemArray[value].title!)
}

@IBAction func sequencePickerSelect(_ value: Int) {
    print(itemArray[value].title!)
}
重写在WKInterfaceController类中有关于Picker的方法, 当Picker获得焦点、失去焦点、选择保持稳定时会触发的方法:
override func pickerDidFocus(_ picker: WKInterfacePicker) {
    if picker == listPicker {
        print("ListPicker Did Focus")
    } else if picker == stackPicker {
        print("StackPicker Did Focus")
    } else {
        print("SequencePicker Did Focus")
    }
}

override func pickerDidResignFocus(_ picker: WKInterfacePicker) {
    if picker == listPicker {
        print("ListPicker Did Resign Focus")
    } else if picker == stackPicker {
        print("StackPicker Did Resign Focus")
    } else {
        print("SequencePicker Did Resign Focus")
    }
}

override func pickerDidSettle(_ picker: WKInterfacePicker) {
    if picker == listPicker {
        print("ListPicker Did Settle")
    } else if picker == stackPicker {
        print("StackPicker Did Settle")
    } else {
        print("SequencePicker settle")
    }
}
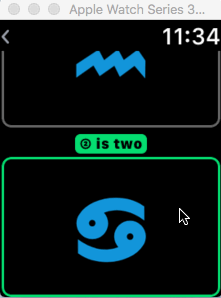
运行效果
List and None:
Stack and Outline:
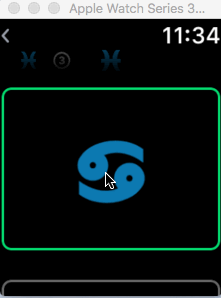
Sequence and Outline with Caption:
WKInterfaceTable
WKInterfaceTable和 UITableView的区别
在 iOS中的 UITableView使用范围是很广的, 它可以实现列表性质的复杂功能。那么在 WatchOS中对应的类是WKInterfaceTable, 但功能上来说相对简单了许多。
1.Table只有行的概念, 没有分区, 没有头尾视图的概念。
2.Table通过Gruop进行自适应布局, 所以没有行高等设置。
3.Table没有代理, 所有行的数据都是采用静态配置的方式。
4.Table的点击事件也是依靠重写WKInterfaceController的方法来实现的。
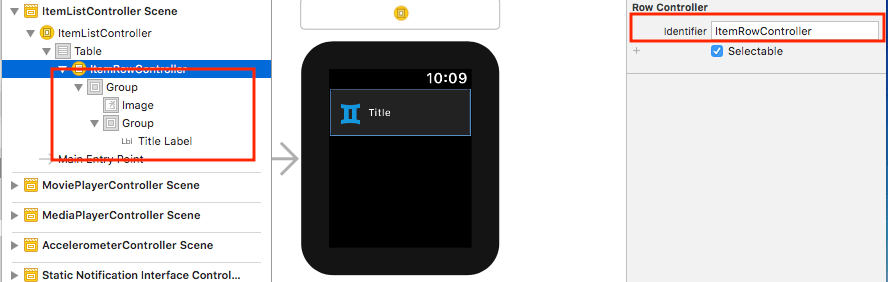
5.Table中是通过自定义的TableRowController来进行控制 TableRow上显示的内容的。TableRowController是一个继承于NSObject的类, 其实从根本上与 iOS中的UITableViewCell类似。
如何使用Table
1.在Storyboard中, 为页面添加一个Table。
2.新建一个TableRowController类继承与 NSObject的 Cocoa Touch类。
3.在Storyboard中, 为添加的Table配置一个或多个TableRowController, 并设置ID。
3.在代码中, 为Table指定行数和TableRowController类型。
4.为TableRowController的每一行配置显示的数据。
代码描述
Storyboard中的配置:

Table的配置及点击事件处理:
    @IBOutlet var table: WKInterfaceTable!
    let dataArray = {
        return [
            ["image": "item_type_0", "title": "Menu Action And Controller Life Cycle"],
            ["image": "item_type_1", "title": "Media Player"],
            ["image": "item_type_2", "title": "Picker Styles" ],
            ["image": "item_type_3", "title": "Interactive Between iPhone And Watch"],
            ["image": "item_type_3", "title": "Interactive Between iPhone And Watch"],
          ]
    }()


    override func awake(withContext context: Any?) {
        super.awake(withContext: context)

        // Set Row Number And Row Type
        table.setNumberOfRows(dataArray.count, withRowType: "ItemRowController")

        for (i, info) in dataArray.enumerated() {
            let cell = table.rowController(at: i) as! ItemRowController
            cell.titleLabel.setText(info["title"])
            cell.image.setImageNamed(info["image"])
        }
    }

    override func table(_ table: WKInterfaceTable, didSelectRowAt rowIndex: Int) {
        print(dataArray[rowIndex]["title"]!)
    }
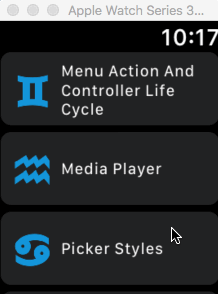
运行效果
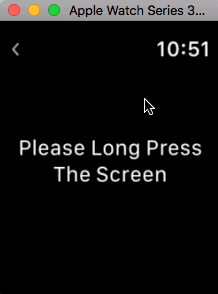
WKInterfaceMenu
Apple Watch的 Retina屏是支持 Force Touch功能的, 提供了一种新的交互方式。这是一个 WatchOS独有的类, 当页面中配置这 Menu时, 按压屏幕将会激活页面中的Menu。并且显示出Menu下的操作, 这些操作是另一个类型, WKInterfaceMenuItem。
Menu最多可显示四个MenuItem, 它们可以关联各自的点击事件, 从而进行你想要的各自操作。
代码描述
在 Storyboard中为页面添加WKInterfaceMenu和WKInterfaceMenuItem, 并为MenuItem设置各自的Image和title。
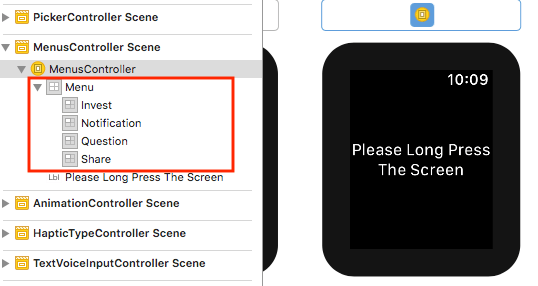
代码关联:
    @IBAction func menuActionInvest() {
        print(#function)
    }

    @IBAction func menuActionNotification() {
        print(#function)
    }

    @IBAction func menuActionQuestion() {
        print(#function)
    }

    @IBAction func menuActionShare() {
        print(#function)
    }
运行效果
WKInterfaceController中的Present方法
在 WatchOS中WKInterfaceController就相当于 iOS中的 UIVIewController, 同样具有类似生命周期和方法。 这里就不再赘述了, 想了解请查看第一篇文章:Watch App架构及生命周期。
在这里要说的是, 在WKInterfaceController中, 有许多重要的Present方法, 这些功能我们可以直接使用, 更加方便了我们的开发。
像平时使用的presentController, 还有上面Alert中涉及到一个, 另外, 还有一些关于文字录入的, 音视频播放的, 音频录制的。
open func presentController(withName name: String, context: Any?) // modal presentation

@available(watchOS 2.0, *)
open func presentAlert(withTitle title: String?, message: String?, preferredStyle: WKAlertControllerStyle, actions: [WKAlertAction])
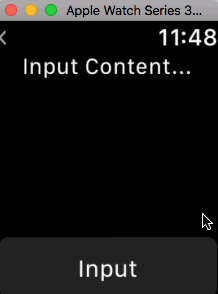
文字录入
presentTextInputController(withSuggestions: ["Hello!", "When are you free?", "Yes."], allowedInputMode: .plain) { (inputText) in
	if let stringArr = inputText {
		print(stringArr)
    }
}
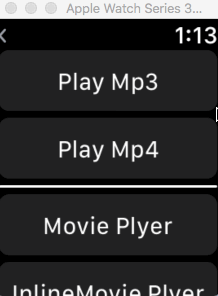
音视频播放
@IBAction func mp4PlayAction() {
    playMedia(name: "music", ex: ".mp4")
}

func playMedia(name: String, ex: String) {
    // MediaPlayer
    let URL = Bundle.main.url(forResource: name, withExtension: ex)
    let option = [WKMediaPlayerControllerOptionsAutoplayKey: true]

    presentMediaPlayerController(with: URL!, options: option) { (isEnd, endTime, error) in
        if error == nil {
            print("endTime=\(endTime)");
        } else {
            print("error=\(error!)")
        }
    }
}
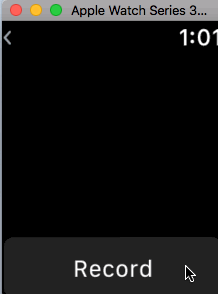
音频录制
func textVoiceInput() {
    let option2: [String: Any] = [WKAudioRecorderControllerOptionsActionTitleKey: "发送",
WKAudioRecorderControllerOptionsAutorecordKey: true,
WKAudioRecorderControllerOptionsMaximumDurationKey: 30]

    // Use App Group URL
    let uurl = FileManager.default.containerURL(forSecurityApplicationGroupIdentifier: "group.watchAppSampler.record")
    let uuurl = uurl!.appendingPathComponent("record.wav")

    presentAudioRecorderController(withOutputURL:uuurl , preset: .narrowBandSpeech, options: option2) { (didSave, error) in
        if error == nil {
            print("didSave=\(didSave)");
        } else {
            print("error=\(error!)")
        }
    }
}
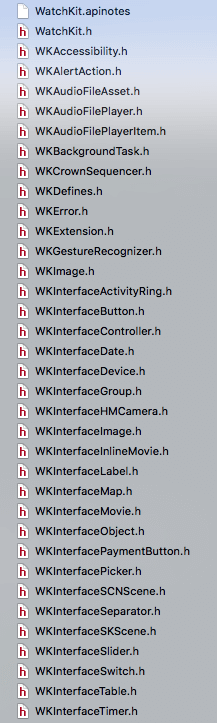
WatchOS中的其它控件和类
在 WatchKit框架中, 还有其它许多的控件和类, 这里就不在介绍了。附一张WatchOS 4.3版本下的所有类的全家福:
相关资料
WatchOS开发教程之一: Watch App架构及生命周期
WatchOS开发教程之二: 布局适配和系统Icon设计尺寸
WatchOS开发教程之三: 导航方式和控件详解
WatchOS开发教程之四: Watch与 iPhone的通信和数据共享
WatchOS开发教程之五: 通知功能开发
WatchOS开发教程之六: 表盘功能开发 WatchOS 开发教程源码:Watch-App-Sampler
Interface Navigation
欢迎指正, wangyanchang21.